Friday, August 3, 2012

FLASHING ORIGINAL OR CUSTOM FIRMWARE (LIKE SYMBIAN BELLE) ON SYMBIAN PHONES (NOKIA N8,n97 mini etc) VIA PC USING PHOENIX 2011

WARNING: Phone flashing is a double-edged sword; it may be useful and dangerous at the same time. It may brick/damage your phone for good (If not done carefully), so please DO NOT flash your device if you don’t know what the hell “Flashing a phone” is.

In this post I will describe the use of latest version of Phoenix to flash the phone (working or dead) with a custom (hacked) firmware (or the original firmware if required). This flashing is usually done in “Dead Phone USB” mode (because in this mode the phone remains switched off and get flashed peacefully (less probability of errors). Also this method works in all situations – normal flashing, dead/bricked phone or custom firmware flashing. Anyway, carefully read rest of the post.
You need to have following before continuing with the process –
a. Phoenix latest version ( search Google for “Phoenix 2011 download”) – only for Windows
b. Navifirm
c. Original Firmware files (downloaded via Navifirm)
d. OPTIONAL – In case you want to flash the phone with a Custom/hacked/leaked firmware then you will also need Custom Firmware files (usually .uda, core and/or rofs files) – you should know where to get these (or search Google).
Now before proceeding with the actual flashing process, make sure -
A. Backup your important phone content (Contacts, media files etc) via PC Suite\Ovi Suite etc. Preferably format your memory card and mass storage memory before flashing the phone (or if you don’t want to format the memory then at least delete everything in E:\sys, E:\private, F:\sys and F:\private folders by connecting the phone to PC via “Mass storage mode”).
B. Download your phones original FW files via Navifirm). Better do not download the xyz.emmc.fpsx file (Memory card content) which is very large in size (around 1GB for N8) and thus will take too much time to download.
C. You can also modify and create your own hacked custom firmware using Nokia Cooker (to safely hack the phone) – refer to this post
D. If you want to flash N8 with Symbian Belle (any leaked firmware) then make sure that you have updated to Symbian Anna first (i.e. you need to have Anna installed rather than any older firmware).
E. ALSO REMEMBER that – DO NOT CONNECT THE PHONE with PC at this stage and until the last step of this process when Phoenix will ask to connect it (Even then connect the phone in “Switched Off” condition)
All set up! Now follow the instructions and screenshots given below –
1. Launch Phoenix and go to “Tools\Data Package Download”

Create a folder named RM-xxx (replace “xxx” with the actual product code of your phone – for example it will be RM-596 for Nokia N8) in the last folder of the location noted in the above screenshot. (Plus also create RM-xxx in “C:\Program Files\Nokia\Phoenix\Products” in case the location in the screenshot is different from it). Now place (copy\paste) all the downloaded ORIGINAL firmware files (and not the hacked or custom ones) into the “RM-xxx” folder that you have just created in both the locations above.
2. Go to File\Open Product in Phoenix

 Note however that if you want to flash the phone with original firmware files (and not the hacked ones) then do not click on “Options” (as shown in the above screenshot), instead check/tick the “Dead phone USB flashing” option and then click on “Refurbish” tab and directly go to the last screenshot below….
Otherwise if you are flashing with a hacked/custom firmware then follow the above and rest of the screenshots given below…


Switch Off the phone completely and wait for the “phone connect” prompt to appear (When Phoenix asks to connect the phone with PC). When it appears click OK and connect the switched off phone to PC using data cable. Flashing will start, wait for the process to complete (do not touch the phone or data cable during the process). After the process completes, phone will reboot, now disconnect it from PC and enjoy.
Troubleshooting – Do not panic if something goes wrong, try following
1. Format the phone with *#7370# code and see if this solves the issue
2. Hard reset the phone by key combinations and see if this solves the issue otherwise
3. Flash the phone again with original firmware files (that you downloaded with Navifirm) by following the above method and everything should be OK

Wednesday, April 25, 2012

Public DNS


What is Google Public DNS?


Google Public DNS is a free, global Domain Name System (DNS) resolution service, that you can use as an alternative to your current DNS provider.
To try it out:
  • Configure your network settings to use the IP addresses 8.8.8.8 and 8.8.4.4 as your DNS servers or
  • Read our configuration instructions.
New! For IPv6 addresses, see our configuration instructions.
If you decide to try Google Public DNS, your client programs will perform all DNS lookups using Google Public DNS.


Why does DNS matter?

The DNS protocol is an important part of the web's infrastructure, serving as the Internet's phone book: every time you visit a website, your computer performs a DNS lookup. Complex pages often require multiple DNS lookups before they start loading, so your computer may be performing hundreds of lookups a day.


Why should you try Google Public DNS?

By using Google Public DNS you can:


Google's motivation, according to the company, is to both speed up Web browsing as well as provide enhanced security. "We believe that a faster DNS infrastructure could significantly improve the browsing experience for all web users," Prem Ramaswami, of Google's Public DNS Team, wrote in a blog post. "To enhance DNS speed but to also improve security and validity of results, Google Public DNS is trying a few different approaches that we are sharing with the broader web community."

Monday, March 19, 2012

How to Re-sync or Re-timing subtitle


You download a movie from torrent, direct download or whatever P2P software but at the end you found out that there is no suitable subtitle for that movie. The entire subtitle you found from the net doesn’t has perfect synchronization with the movie as you hope for. In the other word, the timing between audio (actor/actress voice) and subtitle doesn’t matching.
And now you start to wonder (I was) if you could re-synchronize the ‘not so match’ subtitle to with this video/movie (voice)?
The answer: Yes you can and it doesn’t require even a single cent. 
Requirement:
  1. Download Subtitle Workshop from www.urusoft.net: Download page here.
    1. Subtitle Workshop is a freeware.
  2. Your movie and it’s ‘not so match’ subtitle (example extension .srt)

Step:1
Install Subtitle Workshop (current version as I type this mini tutorial is 2.51).
Launch your Subtitle Workshop 2.51
Load your movie into Subtitle Workshop by : Click on Movie à Open (from the its menubar)
Load your “not so match” subtitle into Subtitle Workshop by : File à Load Subtitle (from its menubar)
    Note : Alternatively, you can drag and drop your movie and ‘not so match’ subtitle into Subtitle Workshop. 
You should have this kind of screen (more of less, if you use Dragon war movie and nedivx dwar.srt subtitle).


Now, what you need to do is to know when is the exact time for the first voice will be heard.
So, play the movie (using Subtitle workshop) by pressing play button and listen carefully. Be ready to hit pause button when you start to hear voice related to subtitle wording below. If you miss the exact time, you can either estimate how much fraction of second you need to deduct or simply redo.
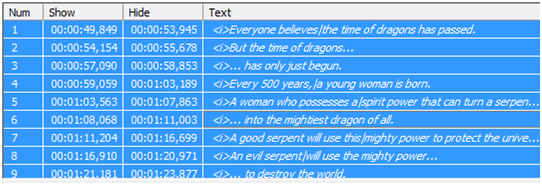
As for my case, I notice that the first voice saying “Everyone believes the time….” start at 8.803 sec.


Note that, in my ‘not so correct’ subtitle, the first phrase is at 49.849 seconds which is almost 41 seconds later than what it should be. Indirectly, you should catch up by now, what you should do is, make all phrases (timing) in this subtitle start (49.849-8.803 = 41.046) 41.046 seconds sooner.
In order to do that,
  1. Make sure your sliding indicator at the correct time
  2. Click on any subtitle phrase and press CTRL+A (or click Edit à Select All)


3.Move Subtitle (Alt+M) or Movie à Subtitles à Move subtitle


Result : All phrase in my subtitle now, move 41 second earlier which is the correct timing for this movie.

Comparison


Wrong timing…. 


Verify

To verify that your new subtitle perfectly match with your movie audio (subtitle) simply click on Play button. Subtitle Workshop will play the movie and display your newly edited subtitle. If you satisfy with the result, save it by : File à Save (or Save As).

Enjoy


Thursday, February 23, 2012

How to install IC-PROG XP Driver?


IC-Prog

This software package allows you to program all types of serial programmable Integrated Circuits using Windows 95/98/NT/2000/ME/XP/VISTA

If your PIC microcontroller is hooked to the parallel port of your PC with the ISP programming cabel, then you can use the program IC-PROG to load your source code into your microcontroller. If you have made your program code in assembler or in MICROC the compiler generates a hexfile. This .hex file you have to load in the microcontroller to let it work. You can download ICPROG from this website:
www.ic-prog.com .
You have to set the program to Funcard programmer. Click on F3 and you wil get the menu to set the hardware you use. Here you can also set the parallel port you use.
 If you use WNT or W2K or WXP you wil have to install the IC-PROG NT-driver that you can download from the same website. Put the driver file in the same folder as the IC-PROG program. Click on Settings>Options>Misc. Check the box Enable NT/2000/XP driver. Click OK.
 Now the program asks you to restart IC-PROG. Click Yes and then it asks you if you want to install the IC-PROG driver. Click Yes again.
The next step is to get the .hex file you want to load in your microcontroller. Click on File > Open set the file type to .hex and select your .hex file and click Open.
 Now you can load the .hex file into the PIC device. Click in the tool bar on the icon Program All.
 Now the .hex file will be loaded into the PIC 16f73 device.